"Aiden" 11x14 Watercolor on 140 lb. paper
Step 1: Get ideas
This client wanted me to create an ultrasound painting as a surprise for his girlfriend. Lucky girl, huh? (Don't worry, I asked before posting this. I am not ruining the surprise.) He liked the ultrasound painting that I did with the keys and wanted something similar, but maybe with baby blocks. He also wanted the name of the child incorporated somewhere in the piece. The size was to be 11x14.
Step 2: Brainstorm Designs
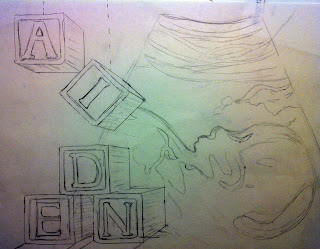
Since he liked "Glimpse through the Keyhole," I knew that I wanted to create a design with dramatic light. During the brainstorming phase, I drew out dozens and dozens of different composition ideas.
Step 3: Sketch the chosen design
I decided on a design and sketched it out on some drawing paper that is the same size as the watercolor paper I plan to use.
Step 4: Add details
In pouring, you really have to have your values (lights and darks) planned out ahead of time. The whole piece depends on how you arrange the values, especially in a painting that is going to have some dramatic light. I know I need super light lights and super dark darks. I rumble around in my kids' toy box and get some blocks out to look at while I complete some value sketches.
Step 5: Transfer the design to watercolor paper
Now it is time to transfer the design to watercolor paper using graphite transfer sheets.
Step 6: Mask and pour layer one
I find my lightest values and I mask them over with drawing gum. Once that has dried, I wet the paper and pipe the paint on with a dropper. Layer one looks like this.
Step 7: Repeat step six lots of times
I find my next lightest value, mask it with the drawing gum and pour the paint. Then I do the same for the next lightest and so on. I do this until I have one layer for each value, which can take a really long time. This is a picture of what it looks like while I am pouring the paint on.
Step 8: Let it dry
I have to let the paper dry out completely in between layers so that the paper does not tear when I remove the drawing gum. This is the final layer drying.
Step 9: Remove the drawing gum
The drawing gum is a mixture of latex and ammonia (yeah, stinky), so it forms a sort of skin over the paper. I use a rubber cement pick up eraser to remove the skin. My painting is underneath!
Step 10: Soften lines and touch up
I use a scrubber brush or Mr. Clean Magic Eraser to soften lines and then I use a direct painting method to add details where needed.
Step 11: Finished!
Now the ultrasound art is finished and ready to frame. Do you think the mother-to-be will like her surprise? Are you wondering how long it takes me to produce a painting like this? See How Long Does it Take to Create a Watercolor Painting?. Still don't quite understand how the pouring process works? See Start to Finish: Pouring Watercolor.
Want to commission an ultrasound painting of your own? Contact me by email at starrwd@gmail.com or visit my website at www.StarrWeems.com. Be sure to connect with me on Facebook.


Looks incredible. Since you pour the paint do you have to stretch the paper? When do you do that?
ReplyDeleteThank you so much! After much experimentation, I have discovered that, with pouring, the paper does not have to be stretched at all as long as it is a high-quality cotton rag paper that is either 140 or 300 pounds. I do still stretch my paper when I use a direct painting method.
ReplyDeleteIt's so important to have access to expert Pregnancy Sonography during the IVF journey. Glad to see Devaki IVF Centre offers such complete care. They are definitely a leading IVF center in Surat.
ReplyDelete