Tuesday, July 23, 2013

Bless You and Keep You


"Bless You and Keep You" 22x30 Watercolor on 140 lb. paper. Sold

For more information, contact starrwd@gmail.com


1st Step: 


First pour: 


Second pour:


Third pour:


Removing masking:


With masking gone:


After touch ups:


Sunday, March 31, 2013

Thursday, March 28, 2013

Autism in Art


"Pieces" Transparent watercolor on 140 lb. European-milled, cotton rag paper. 11x14
Original currently available. $246 Prints can be purchased through Fine Art America
Contact starrwd@gmail.com for inquiries or connect with me on Facebook

Sunday, March 17, 2013

Commissioning Art


Happy client Janet Stubblefield holding a portrait of her granddaughter. "Samantha Grace" 14x18


Mothers Day, graduations, weddings and baby showers... spring is a popular time to commission paintings for gifts and keepsakes. An artist's schedule fills up quickly during this season! Each year, I find myself having to turn people away, so don't wait until the last minute to look for a super special gift. Now is the time to think about commissioning a piece of art for spring or summer, so contact me at starrwd@gmail.com to reserve your painting. Information below.

Value based on $1.60 per square inch, plus tax (if applicable) and shipping. 

5x7  $56
8x10 $128
11x15 $264
16x20 $512
15x22 $528
20x26 $832
22x30 $1056


To see more work, visit my website at www.StarrWeems.com or connect with me on Facebook or Instagram


Wednesday, March 13, 2013

Painting Memories: Ball, Kerr, Atlas and Mason Jars


My childhood memories are full of colorful jars. 

Vibrant jars of produce cooled on my great-grandmother's kitchen shelves. Jars brimming with colored water cast red, blue and yellow shadows on our butcher block. My grandmother's button collection sparkled at me through a jar on her dresser. Sometimes on warm summer evenings, I fell asleep by the light of a Mason jar shimmering with fireflies.

I guess you could say that I like to paint jars because it gives me something to store my memories in.  Below are some of  my watercolor paintings that depict the colorful jars of my childhood. 


"July's Harvest" 22x15 


"Alabama Summer Day" 8x10 Collection of Alexandra Ragland.


"Labyrinth" 12x15

"Night Lights" 22x30

"Plans for Pancakes" 22x30

"Summer Magic" 20x26

"Summer Sparkles" 20x26


"Small Harvest" 5x7


"Little Night Lights" 5x7

"Mint Julep" 5x7

For information on purchasing prints, originals or to commission a work, contact me at starrwd@gmail.com or connect with me on Facebook at www.Facebook.com/starrweems.


Friday, March 8, 2013


This is a sampling of my watercolor paintings available at Red Door Gallery in Hartselle, Alabama. 
From the top left corner, clockwise:
"Sweetgum Prickles" 15x22 
"July's Harvest" 15x22
"Night Lights" 22x30
"Acorns" 15x22


Monday, February 25, 2013

Steps to Creating a Poured Watercolor Portrait


"Samantha Grace" Transparent watercolor on 140. lb European-milled, cotton rag paper. 12x18

This beautiful baby portrait was commissioned by the little girl's grandmother. The following photographs show the watercolor pouring process that I used to complete the work. 


First, I sketch my image in graphite and then use drawing gum to mask out the parts that I want to leave white. 


Next, I mix up paint, wet the paper, pipe the paint on to the paper with a pipette and let the excess paint run off the bottom left corner. 


Once completely dry, I brush on another layer of drawing gum in the areas that I want to keep light. 


Then I pipe on another layer of paint. 


Once that layer is totally dry, then I add more drawing gum to the areas I want to maintain. 


Then I pipe on another layer of paint...


Next, I add even more drawing gum and pipe on another layer of paint. 


This is what it looks like when all layers have been poured and the drawing gum is ready to be peeled off to reveal the painting underneath. 


I use a rubber cement pick up to remove the drawing gum


The layers underneath are revealed and now I know what I'm working with. 


I use my scrubber brush to soften lines and move paint around.


I used staining paint this time, so the scrubber isn't cutting it. I have to pull out the big gun: a Mr. Clean Eraser. 


Now I'm getting somewhere with the scrubbing. Time to start adding details.


Sometimes instead of mixing up paint, I use a scrubber to activate the paint that is already on the paper and then use that as a well to pull from. I dip a brush into the activated paint and use that to create details on other parts of the image. 


I continue to add details until I am satisfied.


Finally, the finished product! Meet Samantha Grace. Leave a comment and tell me what you think. 

Do you want to own a poured watercolor of your own? Contact me

Questions on how much a watercolor like this is worth?   See here

Wondering how long it takes to create one of these pieces? This post explains


Would you like to see more step by step examples? Check out these posts:


Thursday, February 21, 2013

Ten and Not Nine: Step-by-Step Watercolor Pouring


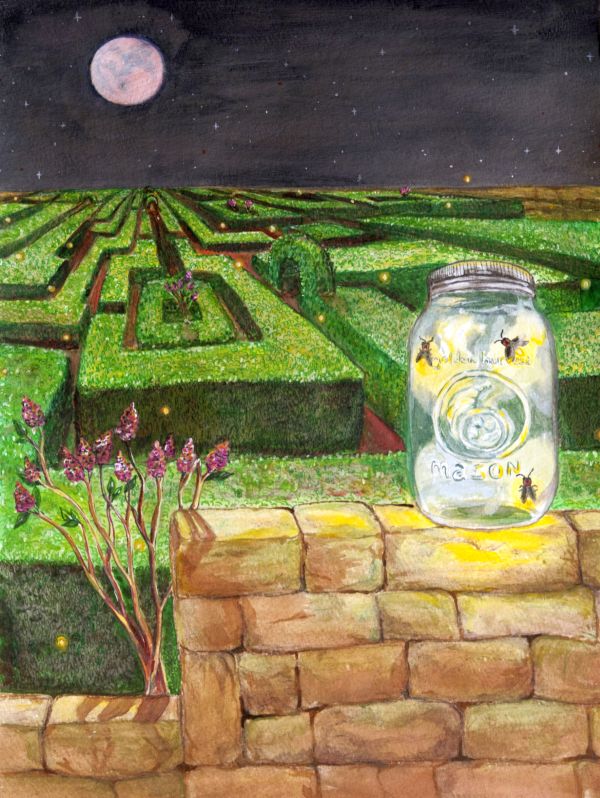
"Ten and Not Nine" Watercolor on 140 lb. paper. 15x22


To create "Ten and Not Nine," I first sketched out my design on 140 lb. Kilamanjaro paper and used drawing gum to mask out the areas that I wanted to leave white. 


Next, I mix up some paint. I pour with primaries only. I usually try to stick with transparent watercolors that are made with a single pigment. 


I wet my paper and squirt paint on with a pipette. This is my first pour. The drawing gum protects the paper from the paint and makes sure that those parts remain white. 


I decide that I want a little bit of texture in this piece to give the light an energetic feel. Yeah, that is holiday tinsel I'm using for the texture. Don't judge. 


I pile some books on top of the tinsel to hold it down while the paint dries. That will help it texture the image a little bit more. 


Once dry, I remove the books. This is what it looks like.


The tinsel leaves a pattern that reminds me slightly of something you might see under a microscope. That inspires me to try out some more texture methods with my students. Ooh! Side project:


Now that the side project is finished, it's back to work on "Ten and Not Nine." I add more drawing gum. This time, I am masking out the second to lightest value. Remember, the first layer protected the parts that I wanted to remain white. These parts are light, but not white. 


I didn't show the part where I pipe on another layer of paint and put tinsel on top of it, but I did it. This is what the second layer looks like once dried.  


And the third layer...


And the fourth layer...


All of the masking and pouring is finished at this point! This is where I start to wonder what my painting looks like underneath all of that drawing gum. 


So I use a rubber cement pick up to start taking the drawing gum off...


And I get to see how the layers underneath the drawing gum look...


Once I remove the drawing gum, I assess the situation. In general, I'm happy with it, but I definitely want to soften some lines and unify the color a bit. 


I wet a scrubber brush and start moving paint around. 


Getting closer...


I continue to scrub, but it becomes apparent that I am not going to get the color unity that I want just from scrubbing. I must do something more drastic. 


I wet down the hair with my sprayer and pour a layer of yellow paint over the hair. 


Yep, that's better! My work here is finished. 


Are you wondering how long a painting like this takes? See How Long Does it Take to Create a Watercolor Painting? 
Want to see more about how the pouring method works? See Start to Finish: Pouring Watercolor.

If you want to commission a painting, contact me by email at starrwd@gmail.com or visit my website at www.StarrWeems.com. Be sure to connect with me on Facebook.